Sander: Difference between revisions
(Create sander page) |
No edit summary |
||
| Line 89: | Line 89: | ||
* The nuts holding the machine on the table have unscrewed themselves before from vibration. Nuts were replaced and threadlocker was applied 2016-12-27, check to make sure all 4 nuts are still tight before use. | * The nuts holding the machine on the table have unscrewed themselves before from vibration. Nuts were replaced and threadlocker was applied 2016-12-27, check to make sure all 4 nuts are still tight before use. | ||
* New power cord | * New power cord | ||
[[Category:Equipment]] | |||
Latest revision as of 07:27, 16 January 2019
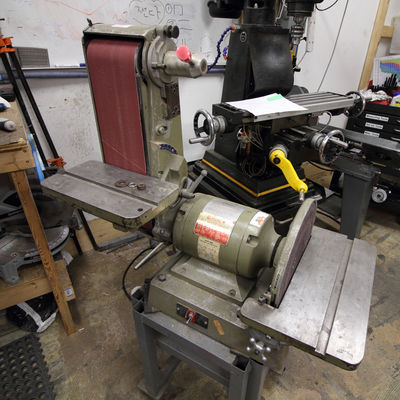
Hacklab acquired a large belt and disc sander/grinder on 2016-06-29. It is mostly intended for wood, but can be used with other materials with care and possibly specialized belts. The sander is on a stand with wheels and is stored on the left of the mill.
- Model: Busy Bee SB-6x12
- 3450 RPM 12" disc
- 5000 SFM 6x48" belt
- 1 HP motor
- Several decades old, but works perfectly fine
Usage & Safety
The belt sander is a dangerous tool if misused! It has a 1HP motor which gives it enough power to grab things out of your hands, and throw them across the room. Touching the running belt/disc will also give you a nasty 100km/h road rash.
- You must be trained to operate this machine
- Tie back long hair, remove long sleeved shirts and jewellery.
- Eye protection must be worn when machine is running.
- Check machine for damage before using, including the bolts that hold it down to the table.
- Brace object being sanded against the table if possible, otherwise it may be thrown by the machine.
- Don't use the right side of the disc table, the disc spins counter-clockwise.
- No unconventional / unsafe use.
- Don't sand anything you don't want in your lungs.
- Do not sand on same spot on disk/belt, move around to reduce heat build-up and wear.
- Do not apply too much pressure and set the disk/belt/work-piece on fire through friction.
- Outside of disk sands faster than inside.
- Sweep / vacuum up chips and leave the machine clean.
- Unplug after use.
Supplies
6x48" Belt
Currently: Klingspor 120-Grit Aluminum Oxide belt from BusyBee installed 2016-12-27
Spares: Stored next to the sandpaper cabinet, behind the drill press
- 220-Grit Busy Bee
- 80-Grit Busy Bee
- Two old, worn-down belts that may still be used for polishing
Replacement instructions:
- Unplug machine
- Open side door on belt cover
- Pull forward and down on big red lever to release tension on top roller
- Slide belt out through where the door was
- Slide new belt on and center it
- Let go of tension lever, check that the belt is still centered
- Close cover
- Plug machine in
- Start the machine but be prepared to shut it off if the belt starts slipping off
- Belt may slide left and right <1cm a few times, then center itself
- Done!
12" Disc
Currently: Primex Abrasives 60-Grit Aluminum Oxide disc from BusyBee installed 2016-12-27
The disc is a peel-and-stick type and should only be replaced when worn out since you can't put a used one back on!
Replacement instructions:
- Unplug machine
- Unscrew the left and right protractors on the disc table (Careful, the left on is busted!)
- Rotate the top left table level stop out of the way
- Remove table from machine to allow better access to the disc
- Peel the old disc off the metal backing plate
- Completely remove any remnants of glue from the backing plate, use a knife blade to scrape it off and finish with rubbing alcohol
- Peel the backing on the new disc about 10~15cm and fold the backing out of the way
- Place disc on the metal, backing first, and center it
- Press down on the peeled portion to make it stick
- Rotate the stuck portion down into the dust extraction port
- Slowly peel and stick down more of the disc until it's all down
- Apply pressure all around disc to make sure it's stuck
- Put table back on (Careful with the busted protractor), tighten it down lightly
- Use machinist square to set the table 90° to the disc
- Swing the rear table level stop back onto the table
- Keep checking table level with the square and tightening the protractors until hand tight
- Plug machine in
- Test run the machine, don't stand in the plane it might throw the disc in.
Wishlist/TODO
- Dust extraction to not fill the shop with wood and other shavings, just adding a vacuum port for the shopvac would help
- Left protractor on the disc table is cracked in two, needs to be welded back together or replaced
- The nuts holding the machine on the table have unscrewed themselves before from vibration. Nuts were replaced and threadlocker was applied 2016-12-27, check to make sure all 4 nuts are still tight before use.
- New power cord
