Milling Machine: Difference between revisions
Jump to navigation
Jump to search
(Add Busy Bee manual, basic specs, DRO info) |
m (Use archive link for busy bee product page, they nuked the original) |
||
| Line 2: | Line 2: | ||
'''Some things about it:''' | '''Some things about it:''' | ||
* Model: [http://www.busybeetools.com/products/knee-mill-with-stand-2hp-220v-craftex.html Craftex CT054] | * Model: [http://web.archive.org/web/20150818102159/http://www.busybeetools.com/products/knee-mill-with-stand-2hp-220v-craftex.html Craftex CT054] | ||
* [[:File:CT054.pdf|Busy Bee manual]] | * [[:File:CT054.pdf|Busy Bee manual]] | ||
* Similar to Grizzly G3102 - [[:File:G3102_m.pdf|Manual]] | * Similar to Grizzly G3102 - [[:File:G3102_m.pdf|Manual]] | ||
Revision as of 08:41, 1 January 2017
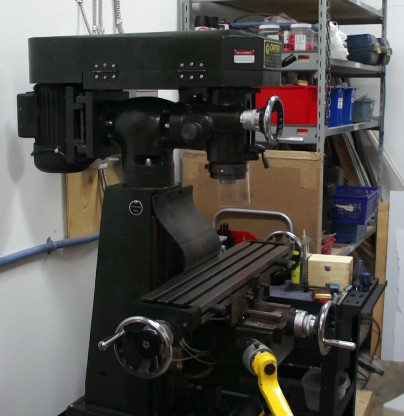
Hacklab has acquired a milling machine as of Aug. 29 2015!
Some things about it:
- Model: Craftex CT054
- Busy Bee manual
- Similar to Grizzly G3102 - Manual
- 2HP motor
- R8 spindle accepts industry standard tool holders
- Speed is adjusted with belts: 240-2760 RPM
- Longitudinal Table Travel (X-Axis): 15-5/8"
- Cross Table Travel (Y-Axis): 6"
- Vertical Table Travel (Z-Axis): 14"
- Spindle travel (Z-Axis 2): 2-1/2"
- Max Distance Spindle to Column (Y): 5-1/2"
- Max Distance Spindle to Table (Z): 12-1/2"
- Table size: 26-2/5" x 6-1/4"
- T-Nut thread: 3/8-16
- Head Tilt: ±45°
- Turret Swivel: ±45°
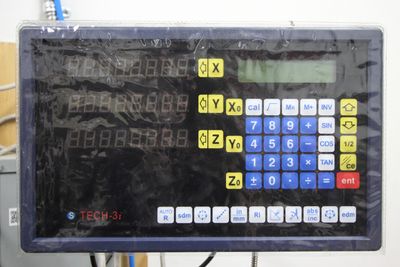
- DRO on X, Y, and soon to be on Z (knee)
- Currently no CNC or power feed functions but we're looking into adding this
- A set of tools and accessories are available to use with the machine or you can bring your own
- Video of the installation: https://youtu.be/tWJ8bkSZlN0
Usage & Safety
The milling machine is both a precision machine and also powerful enough to seriously hurt you. It needs to be treated with the same respect you would give any precision tool. All members are welcome to use the machine after being shown how to use it properly.
- Only trained members may use this machine.
- Tie back long hair, remove long sleeved shirts and jewelry.
- Eye protection must be worn when machine is running.
- Check all tooling and machine for damage before using.
- Sweep / vacuum up chips and leave the machine clean.
- No unconventional / unsafe use.
- Usage on non-metals requires your own tools.
- No hammering on the machine table. It is high precision!
- You break it, you buy it!
You MUST be trained before using this machine. Please consult a member who knows what they are doing. You can help a guest with a job but guests are not permitted to use the machine themselves.
Note that knowing how to use a milling machine is not sufficient - You must be shown by a trained member the intricacies of our machine.
Feeds and Speeds / Feed Direction
- Learn about feeds and speeds for the cutter diameter and material you are using. Too fast or slow RPM can damage cutters and make it harder to work.
- Learn about cutting direction (climb vs. conventional cutting) and use the correct feed direction. Climb cutting takes more effort on the handwheels!
- There is a chart on the mill cart for calculating the maximum RPM for a given tool bit size and material. The chart was generated using this calculator (source code).
Tips and Advice
- Non-metals are okay, but you should use your own tools and be extra careful if you don't know how the material will behave.
- The fine adjust handwheel on the quill is not as accurate as the knee for up/down motion. Lock the quill before milling and use the knee to plunge into the material or to set the height of your cut.
- To change tools in the same collet don't unscrew the drawbar more than a few turns. Tap with a rubber mallet to loosen the collet and change the tool. Push the tool in as far as possible.
- Don't use end mills in the drill chuck! The accuracy will be much lower and you will risk breaking the tool.
- Four-flute end mills cannot plunge as fast as two-flute type. Go easy on it.
- Clean out the spindle before mounting the collet or drill chuck to reduce the runout on the tool.
- Do not mill structural-grade steel. It contains impurities which can damage tools.
- Plan your moves to avoid ruining your part or cutting into the table or the vice. These are expensive for you to replace!
- Pass the material with approx. 1/3 or 2/3 of the tool end cutting into fresh material. Do not centre the tool on the edge of fresh material.
- You can plunge up to 1/2 the cutter diameter per pass. The end mill is not a drill bit!
- Take the cutter away from the material before turning off the motor.
- Do not use oil on aluminum except for drilling or tapping.
Digital Readout
The mill is fitted with a TDS-3i DRO.
- TODO: Scan the manual and upload it here, there doesn't appear to be a PDF version of it on the internet.
Supplies
- Busy Bee Tools: http://www.busybeetools.com
- Accusize: http://www.accusizetools.ca/upfile/2014-2015.pdf
- KBC Tools: http://www.kbctools.ca/

