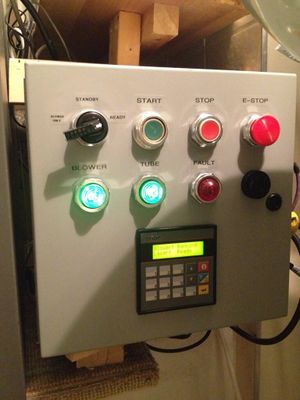
Laser Power Controller

The HackLab's Laser Power Controller controls the laser control power and tube, and monitors the blower to ensure it is working. It's located in the big box under the laser control computer.
Hardware
- Unitronics M91-2-R1 Programmable Logic Controller
- Programmed using U90 Ladder software (in ladder logic)
- 2x Siemens contactors
- One for laser control power, one for tube
- 1x 24V PSU
- Powers most control electronics
- 1x 12V PSU
- Powers the light outside the room
- Pressure sensor
- 0-15" WC differential pressure input
- + input to ambient, - input to duct where it enters the laser
- Reading increases with increasing vacuum
- 4-20mA output
- 0-15" WC differential pressure input
- 10A circuit breaker for main power input
- Many terminal blocks to tie wiring together
- Knob, buttons, flashy lights, buzzer
Connections (on right side of box)
- CONTROL POWER - Connect power cord from the power supplies in the laser.
- TUBE - Connect tube power cord
- E-STOP Loop - Connect to 1/8" plug coming from laser (which integrates the power controller into the main E-STOP loop)
- Tip/Ring connected together when everything is normal, connection broken when in E-STOP.
- Sleeve not used
- Warning Light - Connect to 1/4" plug coming from the light on the ceiling.
- Provides +12V when tube is powered.
- Power input - Connect to NEMA 5-15p to IEC C19 cord
Typical Use
- Turn the selector switch to READY to turn on the laser control power
- To ready the tube
- Press and hold START on the Laser Power Controller to activate the tube output.
- You should hear the blower in the shop turn on, then the tube's cooling fans turn on.
- You are now ready to laser.
- Press and hold START on the Laser Power Controller to activate the tube output.
Maintenance
- Pressing the red i button on the PLC when the selector is in STANDBY and nothing is running gets you into the maintenance menu.
- Use up/down arrows to scroll through the menus. You may need to press enter to leave editing mode, first.
- First screen shows you the hourmeters for blower and laser tube.
- Second screen lets you set the pressure thresholds for low and high faults, and shows you the current duct pressure in inches WC.
- Third screen lets you set the maximum length of time the blower will run to ventilate the area after a job.
- Use up/down arrows to scroll through the menus. You may need to press enter to leave editing mode, first.
Faults
- Faults will prevent the tube from starting if they happen as the blower is being turned on.
- If a fault occurs in the middle of a laser job, the system will keep functioning but sound the alarm/light the FAULT light
- You can silence the alarm by holding the START button, if you need to finish the last tiny bit of a job or if you know for sure it is a false alarm.
- Faults can be cleared by switching to STANDBY and waiting one second.
- Current faults are:
- DUCT UNDERPRESS - Duct pressure is lower than the threshold. Check to see if the blower has failed.
- DUCT OVERPRESS - Duct pressure is higher than the threshold. Check to see if the duct is clogged at the laser end.
- BATT LOW - The internal SRAM backup battery in the M91 controller is low. Replace it.
Program
- Firmware/program can be edited using the freely downloable Unitronics U90 Ladder software
- Code for it is stored at https://github.com/wgprojects/laser-power-controller/tree/ContinuousBlowerMonitor
- Older version: https://github.com/hacklabto/laser-power-controller
- The software to edit the ladder logic and talk to the PLC is called "U90Ladder"
- In the Lab Ops bin, you will find a hacked-up DSL filter which is a RJ11 to RS232 adapter, which you connect to the RJ11 port on the PLC
- Not the I/O expander port, the other one!
- In U90Ladder, click Controller>Download
- Yes, 'download' is the thing you want to do to write ladder logic to the PLC.
Future work
- Ideally the Laser Power Controller will once again control the blower, as it did back in the Kensington Market location.
- The blower contactor in the shop is currently controlled by Start and Stop buttons.
- The PLC should be in control of this contactor.
- The M91 PLC is out of available outputs, and an I/O expander seems to be an expensive option.
- We will have to steal at least one existing output and re-use it to directly drive this contactor.
- Need to investigate the coil voltage on this contactor, and see if we need an additional relay in the shop.
- The blower contactor in the shop is currently controlled by Start and Stop buttons.