Vinyl Cutter Manual: Difference between revisions
Jump to navigation
Jump to search
m (Wiki Link updates, and grammar fixes around them.) |
(Added images and clarification.) |
||
| Line 15: | Line 15: | ||
# Ensure Vinyl cutter is connected over USB (USB-B to USB-A) to the computer, there may be some hubs involved | # Ensure Vinyl cutter is connected over USB (USB-B to USB-A) to the computer, there may be some hubs involved | ||
# Open Easy Cut Studio on the computer | # Open Easy Cut Studio on the computer | ||
#* [[File:Vinyl Cutter Manual 1.png|thumb|none]] | |||
# New document, set size etc. | # New document, set size etc. | ||
# Import your | #* [[File:Vinyl Cutter Manual 2.png|thumb|none]] | ||
# Scale and move the | #* [[File:Vinyl Cutter Manual 3.png|thumb|none]] | ||
# Import your SVG or other vector. (Note you can also vectorize DIRECTLY IN THE SOFTWARE) | |||
#* [[File:Vinyl Cutter Manual 4.png|thumb|none]] | |||
#* [[File:Vinyl Cutter Manual 5.png|thumb|none]] | |||
#* [[File:Vinyl Cutter Manual 6.png|thumb|none]] | |||
# Scale and move the SVG to match the print size desired. Typical cutter settings have the image come out sideways. | |||
#* [[File:Vinyl Cutter Manual 7.png|thumb|none]] | |||
#* [[File:Vinyl Cutter Manual 8.png|thumb|none]] | |||
# Prepare the cutter, get your material, place it on the rear rollers. | # Prepare the cutter, get your material, place it on the rear rollers. | ||
#* [[File:Vinyl Cutter Rear 1.jpg|thumb|none]] | |||
# Flip up the clips and place them over top of the rollers near the cutting surface | # Flip up the clips and place them over top of the rollers near the cutting surface | ||
# Feed the material evenly up to the clips. It does not need to be all the way to the right, the cutter senses the position of the material, feed at least past the | #* [[File:Vinyl Cutter Rear 2.jpg|thumb|none]] | ||
# Click Cutter in the tool bar | # Feed the material evenly up to the clips. It does not need to be all the way to the right, the cutter senses the position of the material, feed at least past the white cut line | ||
#* Ensure settings match here roughly and that the preview has the unused space of your | # Click "Cutter" in the tool bar | ||
#* Vinyl pressure should be set for your material. A good pressure is generally 70, or at least over 60. You can do test cuts if you have a new material. | #* Ensure settings match here roughly and that the preview has the unused space of your canvas correctly to conserve vinyl. (Go back and move your image if there are gaps near the arrows or edge of material) | ||
#* [[File:Vinyl Cutter Manual 9.png|thumb|none]] | |||
#* Vinyl pressure should be set for your material. A good pressure is generally 70, or at least over 60. You can do test cuts if you have a new material. | |||
# When cut is over turn off power | # When cut is over turn off power | ||
# Cut off your piece and backing; again conserving as much vinyl as possible | # Cut off your piece and backing; again conserving as much vinyl as possible | ||
# Done! Now is the fun part of picking off all the garbage. | # Done! Now is the fun part of picking off all the garbage. | ||
#* [[File:Vinyl Cutter Ex 1.jpg|thumb|none]] | |||
#* [[File:Vinyl Cutter Ex 2.jpg|thumb|none]] | |||
# If applying decal you can add a layer of transfer paper to help apply the sticker. | |||
== To Do: == | == To Do: == | ||
* Registration marks for existing. | * Registration marks for existing. | ||
Latest revision as of 02:56, 14 January 2023
The GCC Expert EX II-52LX Vinyl Cutter

Note the license is tied singularly to the Shared Windows PC, and if we want it to run on a new machine it first needs to be deactivated on this machine!
Basic Use Guide:
- Login to the Shared Windows PC on the Electronics Bench
- Turn on Vinyl Cutter (left side, power rocker, ensure AC cable is plugged in), the cut head will move back and forth and fans will spin up.
- Ensure Vinyl cutter is connected over USB (USB-B to USB-A) to the computer, there may be some hubs involved
- Open Easy Cut Studio on the computer
- New document, set size etc.
- Import your SVG or other vector. (Note you can also vectorize DIRECTLY IN THE SOFTWARE)
- Scale and move the SVG to match the print size desired. Typical cutter settings have the image come out sideways.
- Prepare the cutter, get your material, place it on the rear rollers.
- Flip up the clips and place them over top of the rollers near the cutting surface
- Feed the material evenly up to the clips. It does not need to be all the way to the right, the cutter senses the position of the material, feed at least past the white cut line
- Click "Cutter" in the tool bar
- Ensure settings match here roughly and that the preview has the unused space of your canvas correctly to conserve vinyl. (Go back and move your image if there are gaps near the arrows or edge of material)
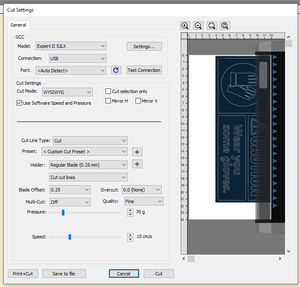
- Vinyl pressure should be set for your material. A good pressure is generally 70, or at least over 60. You can do test cuts if you have a new material.
- When cut is over turn off power
- Cut off your piece and backing; again conserving as much vinyl as possible
- Done! Now is the fun part of picking off all the garbage.
- If applying decal you can add a layer of transfer paper to help apply the sticker.


To Do:
- Registration marks for existing.