Metal Bandsaw: Difference between revisions
Jump to navigation
Jump to search
(Created metal bandsaw page) |
No edit summary Tag: Mobile edit |
||
| (3 intermediate revisions by 3 users not shown) | |||
| Line 28: | Line 28: | ||
=== Saw blade === | === Saw blade === | ||
Currently: 1/2" wide metal blade from BusyBee | Currently: 1/2" wide metal blade from BusyBee | ||
*https://www.busybeetools.com/products/blade-64-1-2in-x-1-2in-14-raker-l-tension.html | |||
*https://www.busybeetools.com/products/blade-64-1-2in-x-1-2in-10-raker-metal.html | |||
The machine has over an inch of adjustment in the top wheel position so it fits blades from about 63" to 65.5" long. | The machine has over an inch of adjustment in the top wheel position so it fits blades from about 63" to 65.5" long. | ||
| Line 54: | Line 56: | ||
=== Table === | === Table === | ||
The machine can be used as a vertical band saw by attaching the table stored in the chip pan of the saw | The machine can be used as a vertical band saw by attaching the table stored in the chip pan of the saw, or in the arm of the wooden storage shelf above it. | ||
# Unplug machine | # Unplug machine | ||
# Unscrew two big flat | # Unscrew two big flat socket cap screws at the top of the bottom blade guide | ||
# Remove small guide plate | # Remove small guide plate | ||
# Place table on the blade guide | # Place table on the blade guide | ||
| Line 75: | Line 77: | ||
* New front cover to replace the chewed up one | * New front cover to replace the chewed up one | ||
* Worm gear box might need new grease since some was lost while replacing bushings | * Worm gear box might need new grease since some was lost while replacing bushings | ||
[[Category:Shop]] | |||
[[Category:Equipment]] | |||
Latest revision as of 16:20, 30 October 2023
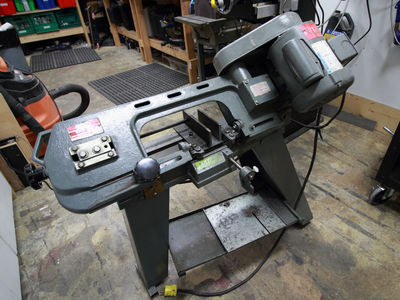
Hacklab acquired a small horizontal metal band saw on 2016-06-29. It is on wheels and stored on the right of the mill, next to the mill cart.
- Model: Dayton 3Z360D
- 4.5" by 5.5" capacity
- Accepts 63-65.5" long 1/2" wide blades
- Bushings replaced 2016-10
- 1/2 HP motor
- Can be used as a vertical band saw by attaching the table to the bottom blade guide
Usage & Safety
- You must be trained to operate this machine
- Tie back long hair, remove long sleeved shirts and jewellery.
- Eye protection must be worn when machine is running.
- Check machine for damage before using.
- No unconventional / unsafe use.
- Do not apply pressure when cutting, the machine works fine under its own weight and the blade might jump off otherwise.
- Clamp work-piece well, the built-in has a second screw to keep it parallel for holding smaller pieces.
- Sweep / vacuum up chips and leave the machine clean.
- Unplug after use
- Don't ram it into the mill handles and table when storing/removing/using
Supplies & Accessories
Saw blade
Currently: 1/2" wide metal blade from BusyBee
- https://www.busybeetools.com/products/blade-64-1-2in-x-1-2in-14-raker-l-tension.html
- https://www.busybeetools.com/products/blade-64-1-2in-x-1-2in-10-raker-metal.html
The machine has over an inch of adjustment in the top wheel position so it fits blades from about 63" to 65.5" long. Internets say that only 1/2" wide blades can be used since narrower ones would run teeth into the metal wheels.
Replacement instructions:
- Unplug machine from power
- Open the front cover
- Be prepared for the blade to jump out if it was not seated on the wheels
- Release tension on the top wheel by using the knob at the top
- Using work gloves or pliers, slide the blade off the wheels and out of the saw
- Blade may catch on the hinge at the bottom, carefully twist it to unjam
- Unpack new blade
- Slide new blade on the wheels, use A-clamps or extra hands to keep it seated
- Tension the blade slowly while making sure it does not slide off
- Proper tension is ???, if it's too tight or too loose, it may jump off the wheels
- Close cover
- Plug in machine
- Run the saw to test if the blade stays on
- Done!
Table
The machine can be used as a vertical band saw by attaching the table stored in the chip pan of the saw, or in the arm of the wooden storage shelf above it.
- Unplug machine
- Unscrew two big flat socket cap screws at the top of the bottom blade guide
- Remove small guide plate
- Place table on the blade guide
- Reuse the two screws to screw the table down
- After use, remove the table
- Replace the small guide plate and screws
- Store table in the chip pan of the machine
Bushings
Original bushings for the top and bottom wheel were worn out and replaced in 2016-10. Insert info about dimensions, supplier and modifications here.
Wishlist/TODO
- Adjust the blade angle to get straighter cuts
- New front cover to replace the chewed up one
- Worm gear box might need new grease since some was lost while replacing bushings
