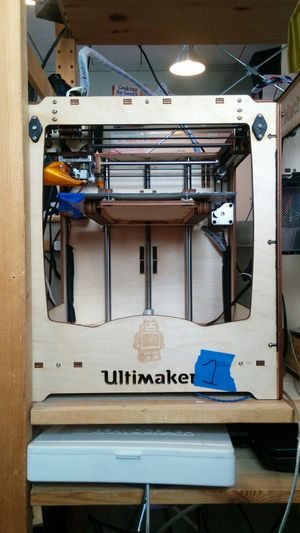
Ultimaker 1

This page documents Ultimaker #1 (Guy). The printer lives on the bottom shelf of the 3D printer tower.
Status
- DOWN ... Thermocouple failure ... DO NOT USE.
- Last known good settings: 220°, 110% flow, print 60mm/s, travel 120mm/s, 0.4 mm nozzle size, 2.85mm filament size.
- Works well using Blue painter’s tape without using the heated bed. (Same setup as Ultimaker 2)
- Cura 15 Settings here
- http://octopi.hacklab.to/
Known Issues and Fixes
- IMPORTANT: OctoPrint will disconnect from Ultimaker 2 if Ultimaker 1 is powered on. If you want to print on both (or will want to eventually), power both on before starting your print on Ultimaker 2
- For better results, wipe the Blue Tape Sheet with Isopropyl Alcohol a few minutes before starting to print.
- If a large solid area is under-extruding then try printing at 220° and 110% Flow. For the PLA/PHA also use 100% fill. (Or figure out the correct retraction settings for that filament.)
- To easily change the filament, rotate this printer 90° -- so that the filament spool points towards the shop door end of the shelving.
Features
- Ultimaker Original with extruder drive upgrade
- 210 x 210 x 205 mm print volume
- 2.85mm filament
- Absolute max temperature: 250 C
- Heated bed for ABS (on second power supply)
- It is managed and accessible from the web GUI: http://octopi.hacklab.to/
Machine Log
| Date | Notes | Entry By |
|---|---|---|
| Sep 8, 2017 |
|
Allen |
| Jul 3, 2017 |
|
Allen |
| Jun 7, 2017 | Stopped Extruding! ... Something like a C-clip has been lost on the Geared/Knerled shaft. .... For now use a copper wire to hold that shaft in place. The proper part needs to be obtained and installed. | Allen |
| Jun 7, 2017 | Lubricate the Z screw using Superlube Synthetic Grease. | Allen |
| Jun 7, 2017 | Heat bed still "cuts out" and drops to about 28°C after less than an hour of printing. | Allen |
| Jun 7, 2017 | Switched bed heater to the second relay on the breakout board, it verks! | Igor |
| May 30, 2017 |
|
Allen |
| Apr 20, 2017 |
|
Allen |
| Mid-2016 | Nozzle cleaned, Bowden coupler springs replaced. Prints well. Use "ABS juice" to stick ABS prints to bare bed. Prints PLA onto blue tape perfectly as well. | Igor |
| Jan 28, 2016 | THE QUARTERBACK IS TOAST. This printer isn't working. The extruder is spinning but not pushing ABS through. I've done as much troubleshooting as I can without risking screwing stuff up. I've sent a query to the mailing list. | alaina |
| June 8, 2013 | Added tool holder onto side of Ultimaker | Norm |
| May 14, 2013 | Tensioned X/Y belts, switched to white PLA and tested new experimental settings. Readjusted Z bed height, printed stuff. | Norm |
| May 11, 2013 | Rod endcaps removed, threadlock (blue) applied to the M3 screws and setscrews locked into place to prevent loosening. Lubricated Z axis and gantry system. |
Norm |
| May 1, 2013 | Printed and mounted new Z home switch retaining mechanism and calibrated. Z homing much more accurate. Observed further inconsistent extrusion, further investigation found online that the knurled bolt is only useful for the last 3 mm nearest the groove for the delrin clip. Adjusted bolt positioning to move good knurling into position, no further grinding or slipping observed, consistent solid extrusion demonstrated. |
Norm |
| April 30, 2013 | Installed new e-panel composite based build platform. | Geordie |
| April 29, 2013 | Printed and installed new extruder feed gear to reduce backlash during retraction. Observed inconsistent extrusion. Small gaps appearing in extrusion, yet full infill occurring on layers otherwise (ie: not clogged). |
Norm |
| April 27, 2013 | Print quality degraded significantly mid-print. Hot end disassembled, burnt PLA removed from brass tube, and dust/dirt removed from teflon-PEEK interface. Print quality returned to normal. Clogged again, cleaned more thoroughly this time. (Used 1/8" drill bit to handheld scrape out burnt PLA very carefully. PLA diameter changed. |
Norm |
| April 24, 2013 | Squeaking noise observed from Y axis axle. Endcap inset screw noticed to be loose, requires new endcap to be printed, and screw not to be overtightened. |
Norm |
| April 12, 2013 | Bed leveling assist tool printed and built. | Norm |
| April 8, 2013 | Belts retensioned, new bearing endcaps installed to reduce backlash further. | Norm |
| April 6, 2013 | Z axis calibration fixed, Z steps/mm in new profile on Git. X/Y axis backlash observed, infill not meeting walls, delamination observed. |
Norm |
| March 31, 2013 | Z axis calibration issues observed. 25mm Test cube showed ~6.8% Z axis error. |
Norm |